
In a place like India were vegetarianism is very prevalent, there is a lot of demand for eggless cakes. But egg being a primary ingredient in cake making its a very difficult ingredient to replace and still get satisfactory results. Due to the heavy demand for eggless cakes, I had to resort to buying ready made eggless concentrates for my cake shop Picardo's though personally I don't endorse these cake concentrates I had little choice for making eggless cakes. Finally after much experimentation I have come up with a perfect recipe for making eggless cakes which is up to my satisfaction.
This tea cake is very moist with a nice banana flavour. I have added cocoa powder in this recipe which gives it a very mild chocolaty flavour but primarily it helps me mask the soapy flavour of baking soda. It is recommended to bake this cake at least a day before you serve it, as this makes the cake easier to slice and most importantly it tastes better
For my blog I haven't added any icing but chocolate ganache will make an excellent icing for this cake.
INGREDIENTS (1kg )
160 gms of powder sugar
120 gms of pureed ripe banana.
60ml oil any unflavoured oil would do.
160 gms hot boiling water.
150 gms thick curd.
60 gms seeded and chopped dates.
1 tsp vanilla essence.
130 gms refined flour.
40 gms cocoa powder.
1 tsp baking powder
1 tsp baking soda
1/4 tsp salt
75 gms Walnuts
1 tsp mixed spice powder (optional)
METHOD
- Grease a cake tin with butter and put a parchment paper so that the cake doesn't stick at the bottom.
- Now mix together curd, oil and banana puree in a large mixing bowl.
- Add powder sugar and mix well
- Separately sieve together flour, cocoa powder, baking powder and baking soda.
- Mix the walnuts with the sieved flour this will ensure that the walnuts are coated with flour, this process prevents the nuts from sinking down in the batter.
- Fold flour mixture with the banana mixture.
- Bring dates and water to a boil and lastly fold this mixture in the cake batter.
- Put the cake batter in the prepared cake tin.
- Bake in preheated oven at 170 degrees for 30 minutes.
Quick Kiddie Treats

This blog update is dedicated to young moms who are always on a look out for quick treats for kids. This recipe is so quick and easy that even the kids can make it themselves and enjoy it. You require just two ingredients that is chocolate and Cadbury's Gems or M&M's or whatever colour full candies you can lay your hands on.
These can also go as great return gifts for your kids birthday party.
You will need

Dark Chocolate - 50 gms
White Chocolate-50 gms
Cadbury's Gems/ M&M's -small packet
Lollipop sticks
Cellophane bags
Colour full satin ribbons

Cling film a plate place lollipop sticks on it and refrigerate the plate for 10-15.


 Let the chocolate set for some time . garnish the chocolates with Cadbury gems and refrigerate the lollies for 5 mins
Chocolate lollies are ready

I remember back during my childhood days , a week before Diwali all my neighborhood aunts used to get together and make the traditional Diwali sweets like Karanjees, Rawa ladoos etc this ritual was a great way of making sweets and enjoying making it at the same time, but now with the passing time ,most of women are working and finding time to make all this sweets is nearly impossible plus making them can really be a cumbersome job. The current trend is to buy readymade sweets and distribute it. This alternative is much more convenient but I think to feel the festive spirit at least one sweet can be made at home. And I promise you my recipe of Sweet and salty chocolate fudge will not take more than ten minutes of your time and when packed in pretty packages makes a great gift plus this is also a great way to use up all the dry fruits boxes we receive during Diwali. This fudge is so easy to make even children can make it.
Ingredients
350 gms of Dark Chocolate (If you don’t get the chocolate slab even Bourneville bars will do)
I Tin of Condensed milk (I have used Milk Maid)

Method


 When the chocolate is melted add the condensed milk to the chocolate


You can get around 12big pieces with this recipe. I have used a plain cello pane paper to cover and tied a ribbon around it to give it a festive look.


I recently ordered for Pizza from a popular Pizza chain and was appalled to know that a 12inch pizza would easily set you back by 500-600 bucks, now that’s big money. Therefore this week thought of blogging about. The recipe for this dough I happen to get from a visiting Italian chef, this is a thin crust fresh dough pizza. And the same dough can also be used to make Foccasia which is a traditional flat bread of Italy. Try this recipe it’s amazing to see the crusty bread and the aroma of the sauce and cheese bubbling away in the oven and for a fraction of the prize which you spend on a ready made pizza.

Ingredients
For the dough
500 gms Flour refined
10gms dry yeast
250ml water
50ml extra virgin olive oil
5gms salt
pinch of sugar

For the sauce
100gms Tomato Puree (Canned)
20gms chopped galic
10gms chopped celery
10gms fresh basil

I have used a mix of Processed cheese and Mozzarella because just using mozzarella can be quiet tasteless so prefer using both processed for its taste factor and Mozzarella for its stringiness.


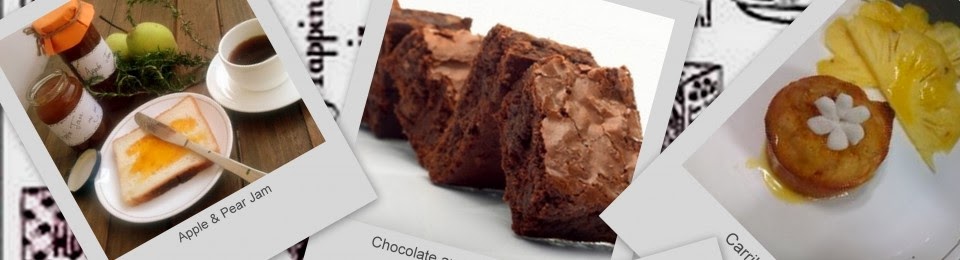
Apple/Pear Jam

Chocolates and dry fruits are the standard gifts which any one and every one thinks of but gifting homemade jams would be such a unique and refreshing idea and jam is something which you generally find at the breakfast table of most homes and I am sure your gift will be well cherished one. After a visit at the local farmers market I decided to make apple and pear jam as these fruits are very much in season therefore they wouldn’t be to heavy on the pockets at the same time the produce would also be of the best quality.

Ingredients
Apples ½ kg
Pears 1/2kg
Water 2 cups
Sugar 750gms
Cinnamon 1 stick
Star aniseed 2No
Vanilla pod 1 no (Optional)
Juice &zest of 2 lemons


Winter Veggie soup accompanied with Potato & Cheese biscuits

When it comes to winter the first thought that comes to my mind is comfort food, now What could me more comforting than a nice bowl of hot soup. This golden winter veggie soup promises to be just the right dish to be served in cold winter evening with my absolutely light and flaky potato and cheese biscuits’.
Ingredients for the soup

250 gms Red Pumpkin
200 gms sweet potatoes
2 medium sized onions
2-3 cloves of garlic
2-3 fresh Red chillies.
600 ml of stock (veggie or chicken any would do)
200 ml of butter milk
Few sprigs of basil
Sea salt
Method
Keep your oven for preheating at 180 degrees
Slice the pumpkin, roughly cut the sweet potatoes and onions
Put all this prepared veggies in a roasting tray sprinkle some sea salt and olive oil.
Roast this veggies for 25 mins . Blitz this mixture in the mixer.
In a sauce pan blend together the mixture and stock and give it a boil. Finish it with butter milk.
The pumpkin and sweet potatoes both will be on a sweeter side therefore the addition of butter milk t gives the soup its balance of acidity
_edited.jpg)
 Ingredients for Potato and Cheese biscuit
1 ½ cup of refined flour
2 tsp baking powder
½ tsp baking soda
100 gms chilled butter
1 cup mashed potatoes
100gms cheddar cheese or even your regular processed cheese will do.
2 tbls cheese spread
1 tsp garlic powder
½ cup butter milk
Sprigs of sage.
Method
In a bowl take some mashed potatoes, you may either go the traditional way of boiling and mashing potatoes or you can take a short cut just crumble some potato smileys which is easily available in any supermarket.
In that potato mixture add 2 table spoons of cheese spread, butter milk and garlic powder whisk it well.
In another bowl take the flour , baking powder and baking soda. Add chilled butter make sure you mix the butter and flour with the tip of your finger. The mixture sure resemble bread crumbs.
Now add the potato mixture and grated cheese in the flour and form in to a rough dough.
Don’t over work the dough just let the ingredients form together. As the lesser you work the dough you will get light and flakier biscuits’.
Flatten the dough with your hands to 1 inch thickness.
You can use a cookie cutter to get the round biscuit shape .
Keep this biscuits’ in a baking tray , Top the biscuits’ up with some sage and brush it some butter milk.
Bake this biscuits in a preheated oven at 180 degrees for 20-25 mins till it get a nice golden colour
Candied Orange Peel


They can be coated with chocolate and make great candies for children and adults alike

Ingredients for making Peanut Butter
 Peanuts -250 gms
Sea Salt ½ tsp
Honey-50 ml or alternatively Jaggery 75 gms
Good Quality Vanilla 1 tsp
Peanut oil/Olive Oil- 50 ml.
Method
 Roast the Peanuts in a Microwave for 5 mins. Remove the outer skin alternatively you can purchase the skinned variety.

In a coffee grinder add all the ingredients together and grind it. Initially it will be all grainy but you need to go on grinding it
 Till you start getting a smooth paste this process will take atleast 4-5 mins of blending in the mixer. Instead of vanilla you can add cinnamon, chocolate chips etc. Store it in a dry bottle .
Method

Peel the fruits.

With the tip of the peeler now core the fruits
and remove the seeds.

Now chop the fruits and remove the vanilla seeds from the pod if you don't have a vanilla pod you may alternatively use vanilla essence.

Put the fruits in a heavy bottomed sauce pan add two cups of water, vanilla seeds the spices cinnamon and star aniseed.

Now cook the mixture i generally keep a butterpaper on top to stop the water from evaporating. Cook this mixture till the fruits are cooked and have become soft.

Purée the mixture now add the sugar and cook over a low flame till the mixture starts setting .This will take around half n hour.

Meanwhile keeps the bottles ready for bottling the jams I have reused old bottles. First you need to sterilised the jars in hot steam for 10 mins and then wiped clean.
Pour the jam in these sterilised jars and seal them you can cover this will brown paper or a checked cloth and tie it with choir rope to give the country feel to it label them and they are ready for gifting.


Ingredients for the soup

250 gms Red Pumpkin
200 gms sweet potatoes
2 medium sized onions
2-3 cloves of garlic
2-3 fresh Red chillies.
600 ml of stock (veggie or chicken any would do)
200 ml of butter milk
Few sprigs of basil
Sea salt
Method
_edited.jpg)

1 ½ cup of refined flour
2 tsp baking powder
½ tsp baking soda
100 gms chilled butter
1 cup mashed potatoes
100gms cheddar cheese or even your regular processed cheese will do.
2 tbls cheese spread
1 tsp garlic powder
½ cup butter milk
Sprigs of sage.
Method
Candied Orange Peel

Oranges just looking at them makes me smile they represent such homely and fresh feel in the kitchen reminds me of those Enid bylton books I used to read as a child and would see pictures of grandmothers preserving fruits in a background full of bottles of jams and jellies . I recently made this preserved orange peels and I was really so happy with the results not only are they so easy to make ,they also are a great way to get that lovely citrusy feel to your baked goods and when I put those preserved peel in those pretty airtight jars they make a such lovely display pieces and to think of it they are eco friendly as well cause you can reuse the peels which you would have easily gone in the bin.
I know now your next thought would be when you can easily buy orange essence or candied orange peel from the market why take the trouble but somehow orange essence I always found was very synthetic and candied peel which you buy easy made has the flavour but it’s so bitter plus they look to so icky
I have taken malta oranges because the peel is quiet thick and easy to use plus they also retain their shape when they are blanched you can use any type of thick skinned oranges. Peel oranges and remove any pith or lacy threads you see attached to it.
Now blanch these orange peels in hot water (Blaching means plunge those peels in boiling water for a minute and then putting them in cold water ) This process you need to do it atleast thrice this process ensure all the bitter ness in the peel is washed away.

Lastly make sugar syrup the way you do it for a gulab jamun and cook the peels in the sugar syrup for 5 mins.

I like putting some cinnamon sticks and star aniseed they not only add the spicy flavour to the peels they enhance the beauty of the bottle as well.

These peels can also be candied just roll them in candied sugar and kept in air tight containers.

Home Made
Peanut Butter
I have been reading a lot on health benefits of peanut butter . When eaten in moderation its supposed to be an excellent source of protein. Fibre, healthy fats and antioxidants making it a good alternative over butter. In addition to that peanut butter has a tendency to keep you satiated for a longer time making it an excellent mid morning snack.
Peanut butter is nothing but plain peanuts. It’s also extremely easy to make . Which gives you all the more reason to make it at home rather than going for the store bought one which is not only expensive , A jar of 350 gms of American Garden peanut butter will cost you around Rs 280 but also you don’t have any control over the amount of sodium , sugar , oil and preservatives added to it. So go the healthy way and make your own peanut butter it hardly will take 15-20 mins of your time.
Sea Salt ½ tsp
Honey-50 ml or alternatively Jaggery 75 gms
Good Quality Vanilla 1 tsp
Peanut oil/Olive Oil- 50 ml.
Method
In a coffee grinder add all the ingredients together and grind it. Initially it will be all grainy but you need to go on grinding it
Till you start getting a smooth paste this process will take atleast 4-5 mins of blending in the mixer. Instead of vanilla you can add cinnamon, chocolate chips etc. Store it in a dry bottle .
No comments:
Post a Comment